How to Run Cisco Modeling Labs on Proxmox
Kevin, AdjacentNode
CML can run inside a Proxmox VM, but nested virtualization is the part you need to get right. Here's the setup, what to check, and where the usual problems hide.
You build a lab so you can break routing without breaking anyone's actual network.
Then you spend the afternoon trying to get the lab itself to work.
Very on brand for networking.
If you already have a Proxmox server, running Cisco Modeling Labs there can be a useful way to practice configurations and troubleshoot small topologies. The catch is that CML isn't just a web application. Many of the routers and switches you add are virtual machines themselves.
Proxmox runs the CML VM. CML runs the network device VMs inside it. That second layer needs nested virtualization.
This guide builds on Matt Schmitz's CML on Proxmox walkthrough, published in April 2024. I've reviewed the steps against Cisco's CML 2.10 documentation and the underlying virtualization documentation. This is a documentation-reviewed guide, not a claim that I've tested every combination of CML, Proxmox, and hardware.
First, understand the support limits
Proxmox isn't listed in Cisco's supported hypervisor table for CML. Treat this as a home lab configuration with an extra troubleshooting layer.
CPU choice matters too. Cisco fully supports CML on Intel processors; some bundled device images only run on Intel. AMD support is best effort. A working CML login page doesn't prove that every device image will boot.
If you're choosing hardware specifically for CML, check the images you need before buying anything. See Cisco's system requirements.
Get the right downloads
For this ISO installation method, you need the CML controller ISO and the reference platform ISO, usually called the refplat ISO. Use the files Cisco provides for your chosen release and edition, and verify their checksums.
The controller ISO installs CML. The refplat ISO supplies the network device images. They do different jobs, so upload both to Proxmox storage that accepts ISO images.
Cisco describes these downloads in Preparing for Bare Metal Installation. We're using that installer inside a VM here, which doesn't make Proxmox an officially supported deployment.
Check nested virtualization before creating the VM
Start on the physical Proxmox host. Make sure hardware virtualization is enabled in its firmware.
Then open the host's shell. On Intel, check:
cat /sys/module/kvm_intel/parameters/nested
On AMD, check:
cat /sys/module/kvm_amd/parameters/nested
An enabled value is Y or 1. N or 0 means nesting is disabled. A missing file needs investigation too; it isn't proof that everything is fine.
Modern Linux kernels enable nesting by default, but a distribution or local configuration can override that. Check it instead of assuming.
If nesting is disabled, configure the appropriate KVM module to enable it. For Intel, the module option is options kvm_intel nested=1; for AMD, it's options kvm_amd nested=1. Put the relevant option in a .conf file under /etc/modprobe.d, checking existing settings first, then apply it during a planned host reboot.
That reboot affects other guests on the host. Don't casually restart your entire home lab because one router won't boot.
The Linux KVM nested guest documentation explains the module options and CPU passthrough.
Create the CML VM
In Proxmox, choose your node and select Create VM. Give it a name you'll recognize later, then select the controller ISO and a Linux guest OS.
Configure the following before starting it.
Firmware: OVMF (UEFI)
Use UEFI and add an EFI disk on your chosen storage. Cisco's ISO installation instructions require UEFI. Secure Boot is optional in the current CML documentation.
CPU type: host
This exposes the host CPU capabilities to CML, including the virtualization features needed by nested guests. The host must still have nesting enabled.
Be aware that host CPU passthrough ties the VM more closely to that hardware. Don't assume you can live-migrate it between different processors while labs are running. For routine moves or backups, stop the labs and shut down the CML VM first.
CPU and memory: size for the lab
Cisco's published baseline is 8 GB of RAM, four or more physical CPU cores, and at least 32 GB of disk. Those are minimums, not a promise that a large topology will fit.
Giving a VM four vCPUs also doesn't create four dedicated physical cores. Other guests still compete for the host's resources.
An example starting allocation for a small lab is eight vCPUs, 32 GB of fixed RAM, and a 100 GB disk, if your host has the capacity. That's a planning example, not a Cisco requirement or a tested guarantee. Add up the requirements of the devices you intend to run, then leave room for CML and the host.
Fixed memory, with ballooning disabled, makes that capacity easier to reason about. The VM should have the RAM you planned for when the devices start.
Disk: use your storage's normal settings
Attach one empty system disk with enough room for the installed images and labs. The installer uses the selected disk's space, so don't attach a disk containing anything you need.
The original guide changes asynchronous I/O to native. I wouldn't turn that into a universal CML requirement. Disk format and I/O options depend on the storage backend. Keep the appropriate Proxmox defaults unless you've identified a specific reason to change them.
Network: choose the right bridge
Connect the VM's management interface to the bridge and VLAN where you want to reach CML. A VirtIO network adapter is a reasonable starting choice.
Don't blindly accept the bridge just because it's selected. Your browser needs a path to this network. A VLAN tag only helps if the Proxmox bridge and upstream network are configured for it.
This interface gets you into CML. Connecting simulated devices to your physical network is a separate external-connectivity setup.
The Proxmox VM documentation covers CPU, memory, disks, and networking.
Attach the reference platform ISO
Before initial configuration, open the VM's Hardware tab and add a second CD/DVD drive with the refplat ISO.
Keep the controller ISO available for installation. The refplat ISO isn't a boot disk.
Finish the wizard without automatically starting the VM until you've checked the hardware and boot order.
Install, then boot from the system disk
Open the console and start the VM from the controller ISO using UEFI.
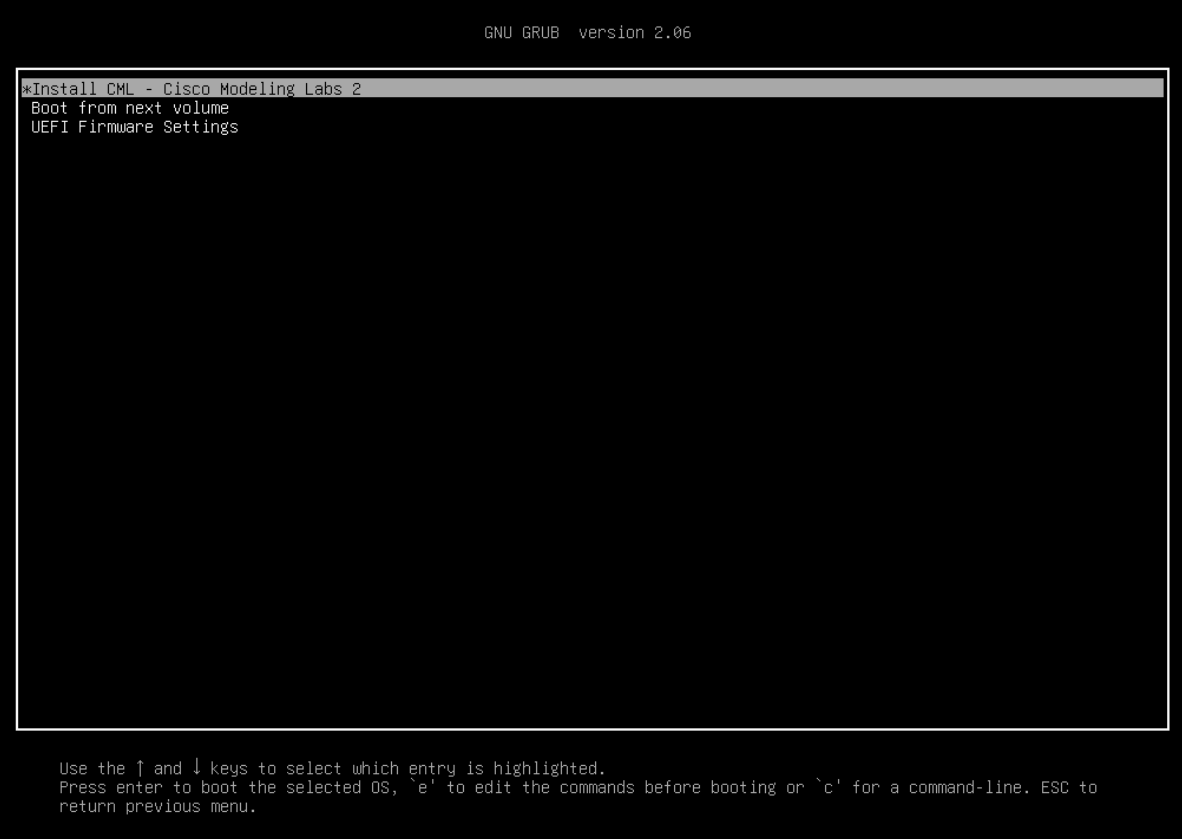
Screenshot from Cisco’s CML 2.10 installation documentation. This is Cisco’s documentation example, not a capture from my Proxmox host.
Current Cisco documentation describes the ISO installation as automatic. Watch the console and confirm that the intended empty disk is selected. Older screenshots and installer prompts may differ.
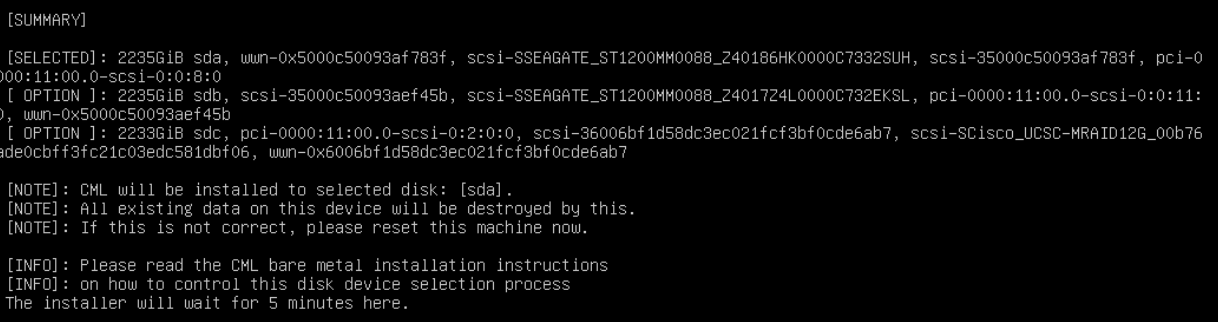
Screenshot from Cisco’s CML 2.10 installation documentation. Cisco’s example shows physical disks. Your Proxmox VM will show its virtual disk instead; compare the disk name and capacity before continuing.
Once installation finishes, boot from the installed system disk. If Proxmox keeps sending you back to the installer, remove the controller ISO from the virtual drive or change the boot order.
Leave the refplat ISO attached for initial setup.
Cisco's ISO installation instructions explain disk selection and first boot.
Complete the initial configuration
Use the VM console to finish setup. Select a standalone server if prompted, then create the requested accounts and configure networking.
There are two separate accounts to keep straight.
The system administrator manages the underlying server through Cockpit. The CML application account signs into the lab interface.
For addressing, use a static IP or a DHCP reservation so you have a predictable place to reach the server. Check the subnet, gateway, and DNS settings.
Allow setup to copy the reference images to the local disk. Don't interrupt it because the progress screen has become boring. Moving large VM images is, unfortunately, not a spectator sport.
When setup finishes, the console shows the management address. The lab interface is at https://<CML-IP>. Cockpit is at https://<CML-IP>:9090.
The account details and setup sequence are in Cisco's initial setup guide.
Confirm the images and license before building a big lab
CML requires the reference images used by your labs to be on its local disk. Having an ISO attached isn't enough.
If the initial copy was skipped or failed, use Copy Refplat ISO to Disk in Cockpit. Check free space and the ISO checksum if it fails. Stop running labs before using the copy operation.
See Cisco's reference image copy guide.
Next, confirm the product configuration and licensing. Current CML documentation says an unlicensed instance operates in CML-Free mode. Paid capabilities require the corresponding product configuration and registration token. Follow the process for your edition rather than assuming that every installation needs the same activation steps.
Now create a small topology with two lightweight device nodes available in your edition. Start them, open their consoles, configure an IP address on each end of their link, and test a ping.
That checks something the login page can't: whether your actual network devices can boot and pass traffic.
When something doesn't work
The installer won't boot
Check that the firmware is OVMF, the controller ISO is attached, and the VM is booting from that drive. After installation, reverse that priority so the system disk boots first.
CML complains about CPU extensions
Check nesting on the Proxmox host and the VM's CPU type. After changing CPU settings, fully shut down and start the VM.
Inside CML, lscpu and ls -l /dev/kvm can help you check what the guest sees. On x86, vmx indicates Intel virtualization support and svm indicates AMD support. CPU flags alone don't prove that nested device VMs will run.
The UI works, but a device won't start
Check image availability, free disk space, allocated RAM, and the node's startup logs. On AMD, also check whether that particular image requires Intel. Start one lightweight node before blaming the entire platform.
You can't reach the web interface
Check the console's IP address, Proxmox bridge, VLAN, gateway, and any firewall rules in the path. Use HTTPS. For Cockpit, include port 9090 and use the system administrator account.
Give yourself a useful first lab
Once two nodes boot and communicate, build one small experiment.
Configure OSPF. Check the neighbor relationship. Change one setting. Watch what breaks. Compare the packet capture and routing table with what you expected.
That's the useful part of a lab. You get to turn an explanation into something you can observe, then break it without becoming the reason everyone in the office suddenly takes lunch at the same time.
Get nested virtualization right, give the devices enough resources, and prove the small topology works before making it bigger.
Enjoying the content? Subscribe for weekly breakdowns.
Join Newsletter